Deviation Actions

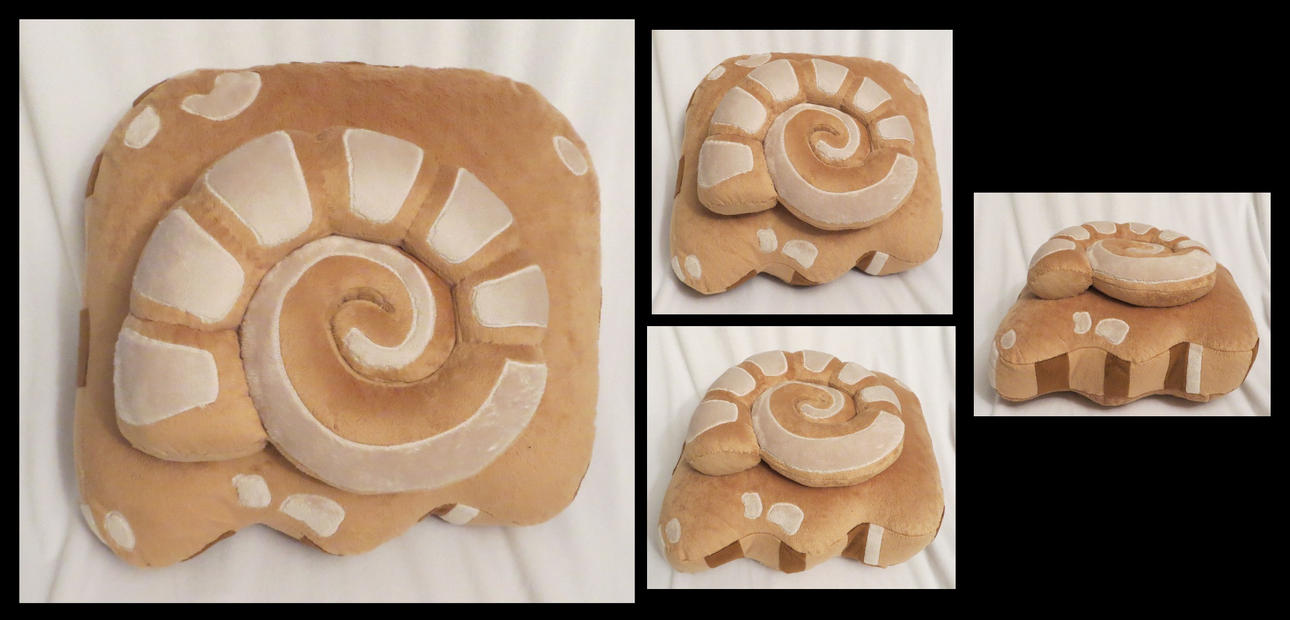
These are INSTRUCTIONS on how to make a Helix Fossil Pillow like the one below. It is not a tutorial and I do not have pictures of the process because I didn't think of it when I was making it, and I'm not going to make another. You will need some previous knowledge of sewing to follow these instructions. I am absolutely not going to teach people to sew - there are lots of resources on the internet if that's what you want. I might add a doodled example pattern later, but that's pretty much all the help you'll get!
Materials:
0.3 meter (1/2 yd) fabric for the pillow body (I used minky, fleece may also be an option)
Scraps of fabric for detailing in lighter and darker browns
0.25 m Medium-weight fusible interfacing (optional)
Thread
Sewing machine or really talented fingers
Scissors and whatnot
A large piece of paper for drafting
Making the pillow:
First, we shall make the pillow base (the block that the true fossil sits on), then we’ll make the fossil, and then we’ll stick them both together.
Pillow front and back:
1. Get your big ‘ol piece of paper (or tape 4 A4 sheets together), and using a ruler, draft out a 16” square.
2. Consult a picture of the Helix fossil, and draw out the rounded corners and edges to make it look like the helix fossil base. This will be the bulk of the pillow – we’ll make the fossil separately and stick it on later.
3. Cut out your pillow shape.
4. Get your fabric and work out how you’re going to position the pillow shape on it. Your fabric should be folded so that you get two pieces when you cut that are mirror images – one for the front and one for the back of the pillow. Remember to think about the nap of the fabric if you’re using minky.
5. Trace the pattern onto the fabric and cut it out, making sure to leave a seam allowance.
6. Get your fusible interfacing and cut pillow-shaped pieces of it in the same way. Iron these on to the back of the fabric to stabilize it. I found that when using a stretchy fabric like minky, the pillow would not hold its shape properly unless stabilized like this.
Pillow detailing:
1. Interface a small amount of your lighter complimentary color (you’ll only need about a 4” square).
2. Cut out bits of this fabric in the shape of the spots you want on the front of the pillow. You can do as many or as few of these as you want, and place them wherever. The Fossil is going to be covering up the middle of the pillow, though, so don’t put them there.
3. Applique the spots on the front piece of the pillow where you want them.
4. I guess you could detail the back of the pillow, too, but who’s that enthusiastic?
Pillow edges:
1. Cut some 2.5 inch wide strips of your main fabric, your darker fabric, and your lighter fabric. These are to make the edges of the pillow. You will need enough to go around the edge of your pillow completely, so you should have about 64” worth of strips all together (this will be a bit too much, but we’ll deal with that later).
a. At least half of these strips should be in your “main” color, then maybe 40% in your darker color and 10% in the lighter color.
7. Take your strips and randomly cut them into rectangular chunks (they should all maintain their 2.5 inch width) – my longest chunk was 4”, and my shortest was 1”. Cut the complementary fabrics into smaller chunks than the main fabric color.
8. Now take all your chunks and sew them back together at the edges to make a long, 2.5” wide strip again. Alternate colors so that you get the striated look of sedimentary rock along the edge.
Sew the pillow together:
1. Take your strip and pin it along the edge of one of your pillow faces, following the curves and taking care not to stretch the edge too much as you go. Once you’ve gone all around the edge, you’ll probably have a tail of edging left over because it was too long. Cut that off, leaving at least ½” extra so that you’ll be able to make a seam later.
2. Sew the edging to the pillow face.
3. Repeat with the other face of the pillow, making sure that you start in the same place so that the faces of the pillow will be aligned.
4. Congrats! You now have a bag that is only open where we haven’t sewed the ends of the edging strip together.
5. Clip the curves so that everything will be smooth when turned right side out.
6. Flip it right side out via aforementioned hole.
7. Stuff it.
8. Sew up the hole using a ladder stitch.
Fantastic! Halfway there!
Making the Fossil
1. Take your paper pillow pattern and draw a simple spiral Helix fossil in the middle, the size you’ll want it on your pillow. Draw details on it that you’ll want to applique in the lighter color of fabric.
2. Cut out the fossil, making sure to cut along the line of the spiral so that you basically end up with a long spirally curved strip of paper.
3. Using non-interfaced fabric, cut two (again, with the fabric folded so each is the mirror image of the other).
4. Cut out pieces of lighter fabric in the shape of the details you want (you’ll have to destroy your spiral pattern to do this, but that’s okay).
5. Take one of these pieces (the one that you’ll want to be facing up when the pillow is all put together), and applique the details on to it. You may want to use some kind of stabilizer here, depending on how much experience you have with applique.
6. Cut out a long strip of your main fabric, 24” long, 1.5” wide at the middle, and tapering gradually and equally to both ends. This strip will be a gusset in the middle of the spiral to maintain plumpness.
7. Take this strip and pin it along the inner edge of the front of the spiral, starting 1” back from the mouth. You’ll have to make a very sharp turn in pinning when you reach the center of the spiral.
8. Sew the strip on.
9. Pin and sew the other half of the spiral on.
10. You should now have a long curving tube. Turn it right side out and stuff it (not too firmly).
11. Cut out an oval piece of fabric that will fit the mouth of the fossil, and ladder stitch it on, adding stuffing before closing if necessary.
12. Using strong thread and careful knots, run a line of basting stitches around the tube in the areas where you want the fossil to be defined into chambers/segments – stitch all the way around, and then pull the thread tight to compress the fabric and stuffing. Tie off carefully. Repeat for each segment.
13. Finally, flip your fossil over and stitch the edges of the spiral together, spiralling outwards towards the mouth. This is an opportunity to make your spiral look all tight and snug and neat. Tie off at the mouth.
Hooray! You now have the two bits of your pillow! Carefully hand sew the fossil to the pillow in the desired place to finish. You may have to go around the fossil twice to get it on there securely.